Manual

A database is essentially a collection of tables, which serve as a standardized method for organizing information (data). While an information system combines the tables (database), information (data), and software to manage the tables and information effectively. These systems can range in size and complexity, from something as small as the Address Book on your mobile phone to something as extensive as Instagram. In EasyDB, an information system is referred to as a workspace. EasyDB allows you to create your own workspace (as the host) or be invited to use someone else's workspace (as guest or admin). The goal is to make it as simple and intuitive as possible, while still enabling you to build and utilize workspaces with multiple tables and organize information effectively.
As mentioned previously, there are three types of users in EasyDB: hosts admins and guests. Hosts are the individuals who own a workspace. Each EasyDB user has his/her own workspace acting as the host, Admins are invited users with the privilege to create tables and design forms, while Guests are invited users with the ability to utilize a workspace. This manual is comprised of two documents: the Guest Manual and the Admin & Host Manual. If you are a host or an admin, it is recommended that you also read the guest manual to gain a better understanding of how your guests interact with your workspace.
-
Guest Manual
Guest Manual
When you receive an invitation from an host in EasyDB, you will receive an email containing instructions. The process is straightforward, and upon completion, you will be registered as a basic user in EasyDB. As a basic user, you will have the ability to create and design your own workspace (as host), and use any workspaces to which you have been invited (as guest).
Upon signing into EasyDB, the first thing you will see is a workspace selector (in case you have multiple workspaces). Simply choose a workspace, and you are ready to navigate, read, write, create, and delete records within the tables of that specific workspace, based on your privileges.
Table records (rows) are presented to you as a form, where the fields (columns) are displayed and can be edited coherently, according to each field's specifications. For example, a regular lastname field is presented as a text input that displays the record's lastname and allows for simple editing. Similarly, a date field is presented as a formatted date with a dropdown button that reveals a calendar when clicked.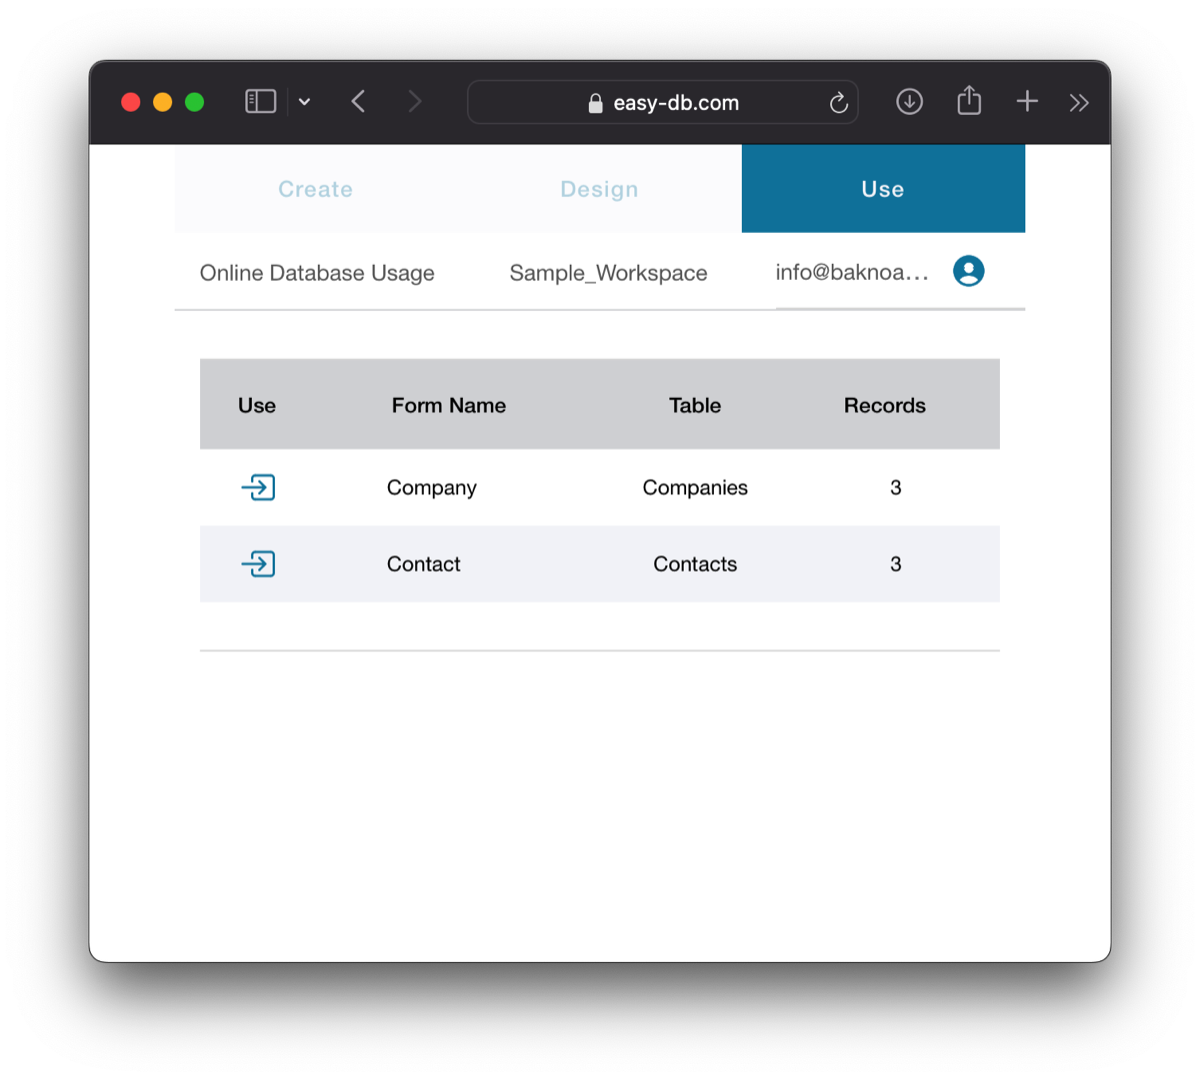
Each form is associated with a specific table, but there may be multiple forms available for a single table. Therefore, when you select a workspace, you will be presented with a list of forms to choose from. Consider this list as your navigation menu. To access this list, simply click on the "Use" tab located at the top. Please note that the other two tabs, "Create" and "Design," are disabled for guests. Only hosts or admins have the ability to navigate to these tabs.
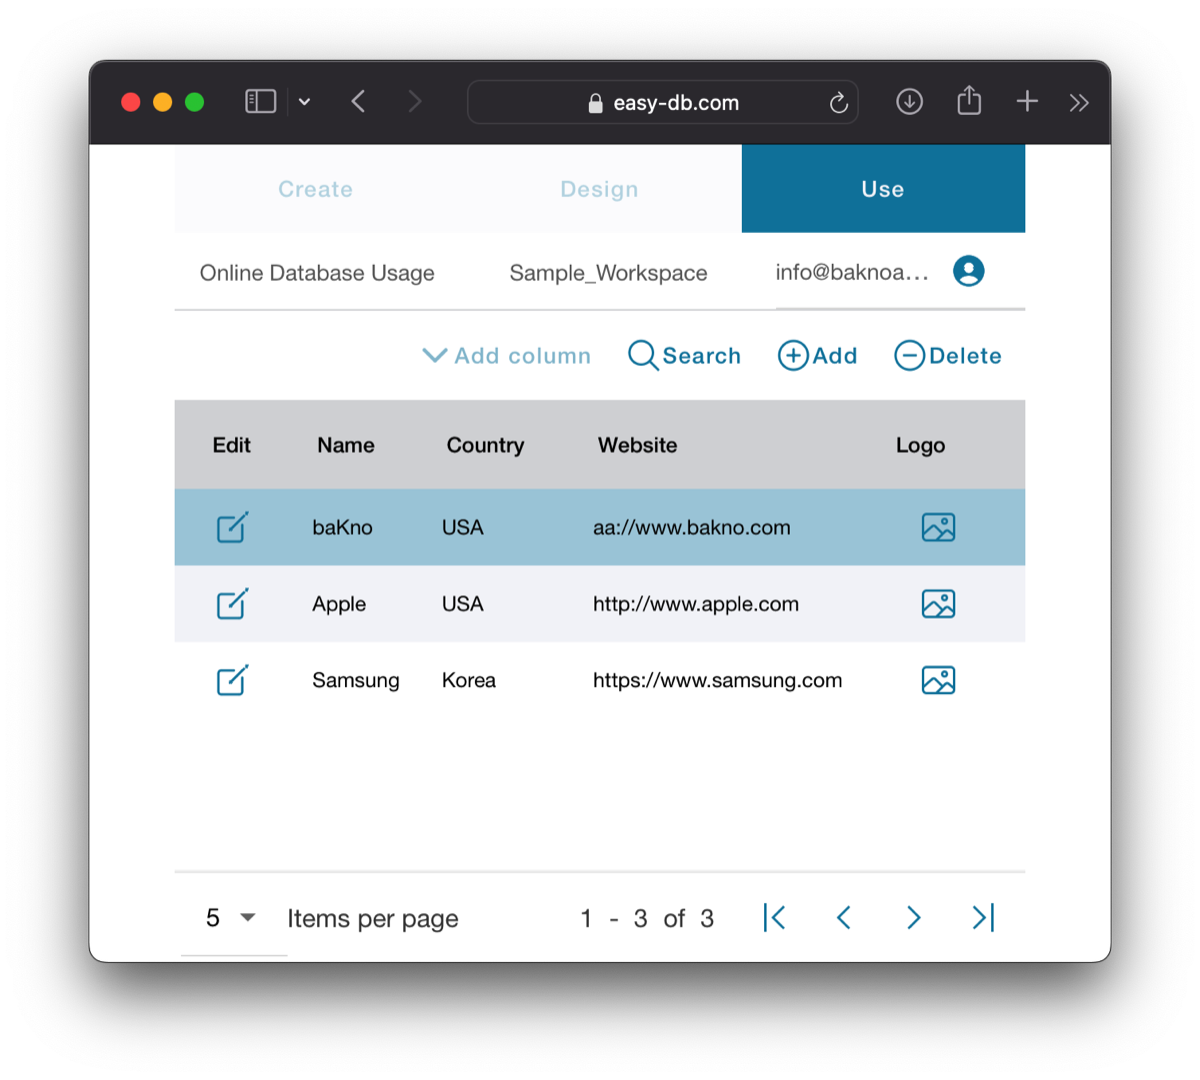
To access each form, simply select it, and you will be presented with a paged list of records. If the associated table contains a small number of records, it will be easy to locate a specific record by simply selecting it. However, if the table contains a large number of records, the most efficient method is to navigate to any record and utilize the Search tool to find the desired record (explained below).
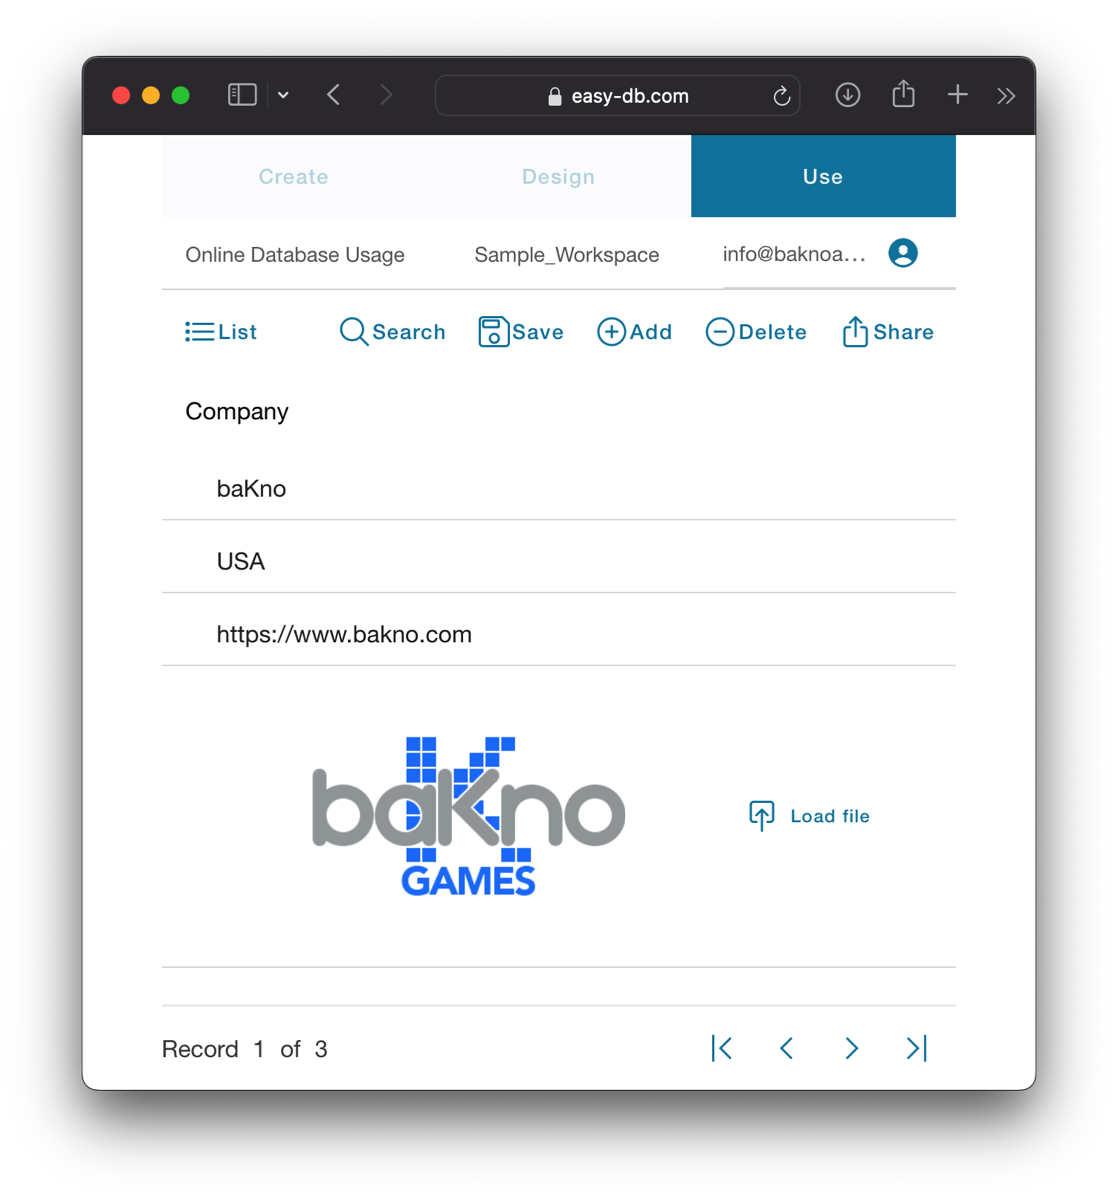
At the top, there are six buttons from left to right:
List button allows you to return to the list of records.
Search button activates the search mode, clearing all fields and transforming input fields into search criteria.
Save button is necessary when you make any edits to a record.
Add button creates a new empty record for you to fill out and save.
Delete button is used to remove a record.
Share button generates a link for you to share a single record as read-only.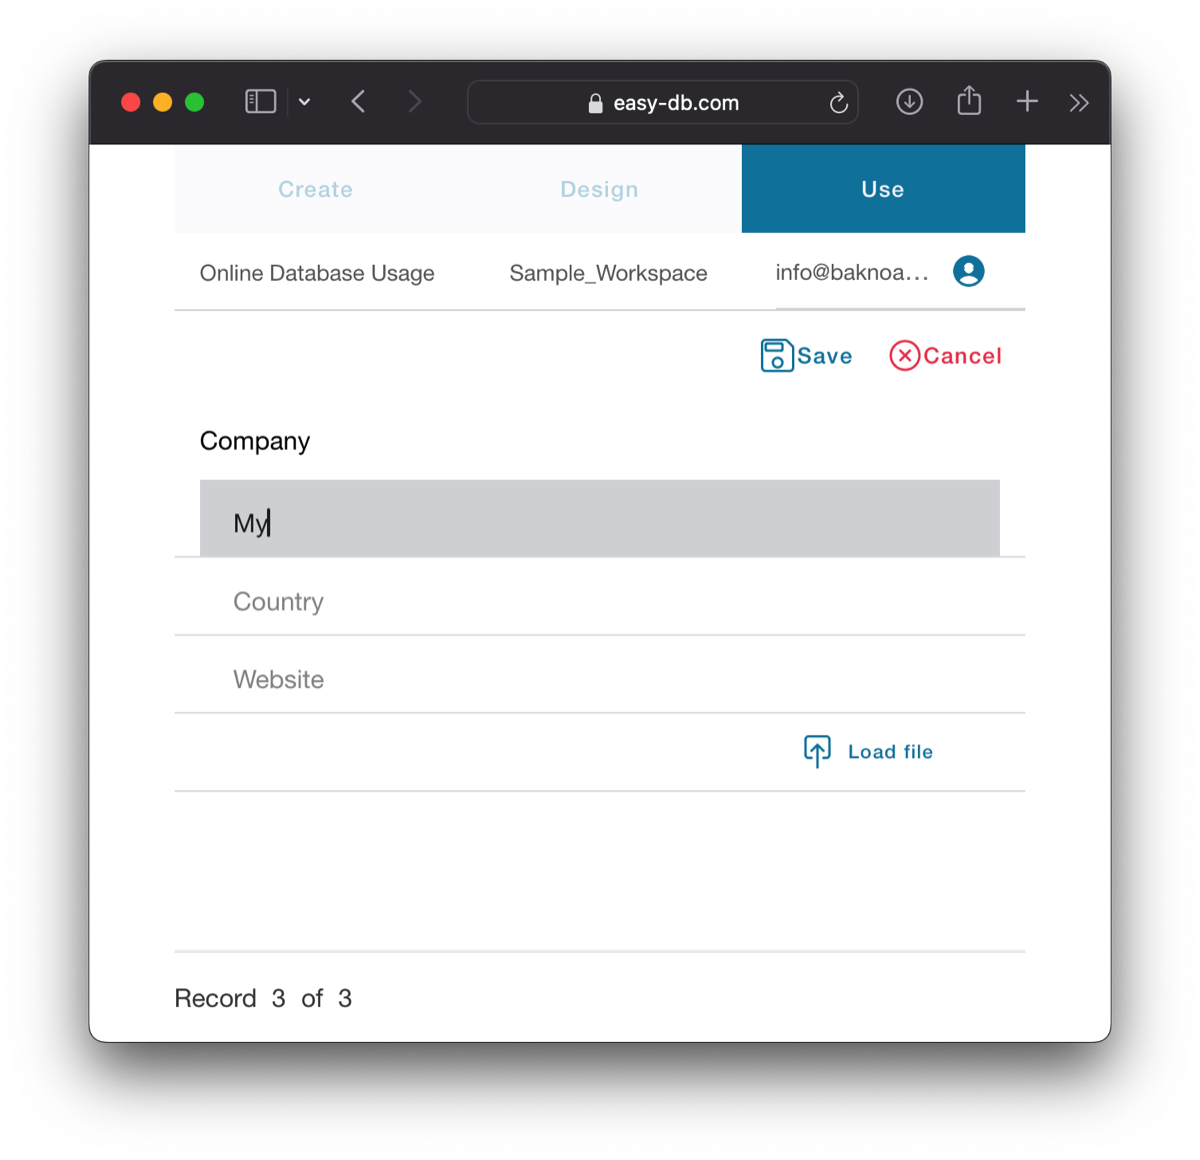
In the middle, you will find the actual form designed by the host. At the bottom, there are four self-explanatory buttons that allow you to navigate between different records within the same table form.
A practical functionality of a database is the ability to establish relationships between records. For instance, in a Contact form, the host can choose to display information from a related record that belongs to another table, such as Companies. This feature is beneficial when you have a single record for a company, so any changes made to it will be reflected in all contacts associated with that company.
The host or admin have the ability to choose how each field is displayed on a form using various components. The available components include Calculation, Date, File, Image, Input, Link, Navigation, Related List, and Select. As a guest, it is crucial to understand how each component functions in order to interact effectively with them. For instance, components like Calculation or Link are designed to display information exclusively and cannot be used as search criteria. -
Admin & Host Manual
Admin & Host Manual
When you select your default workspace or when you add a new workspace (as an advanced user), you become the host of that workspace. You can start by adding tables and fields in the Create tab. Afterward, you can define the user interface in the Design tab. Additionally, if you were invited to a workspace, the host can change you profile from guest to admin. As an admin you have access to the Create and Design tabs the same as the host.
Create
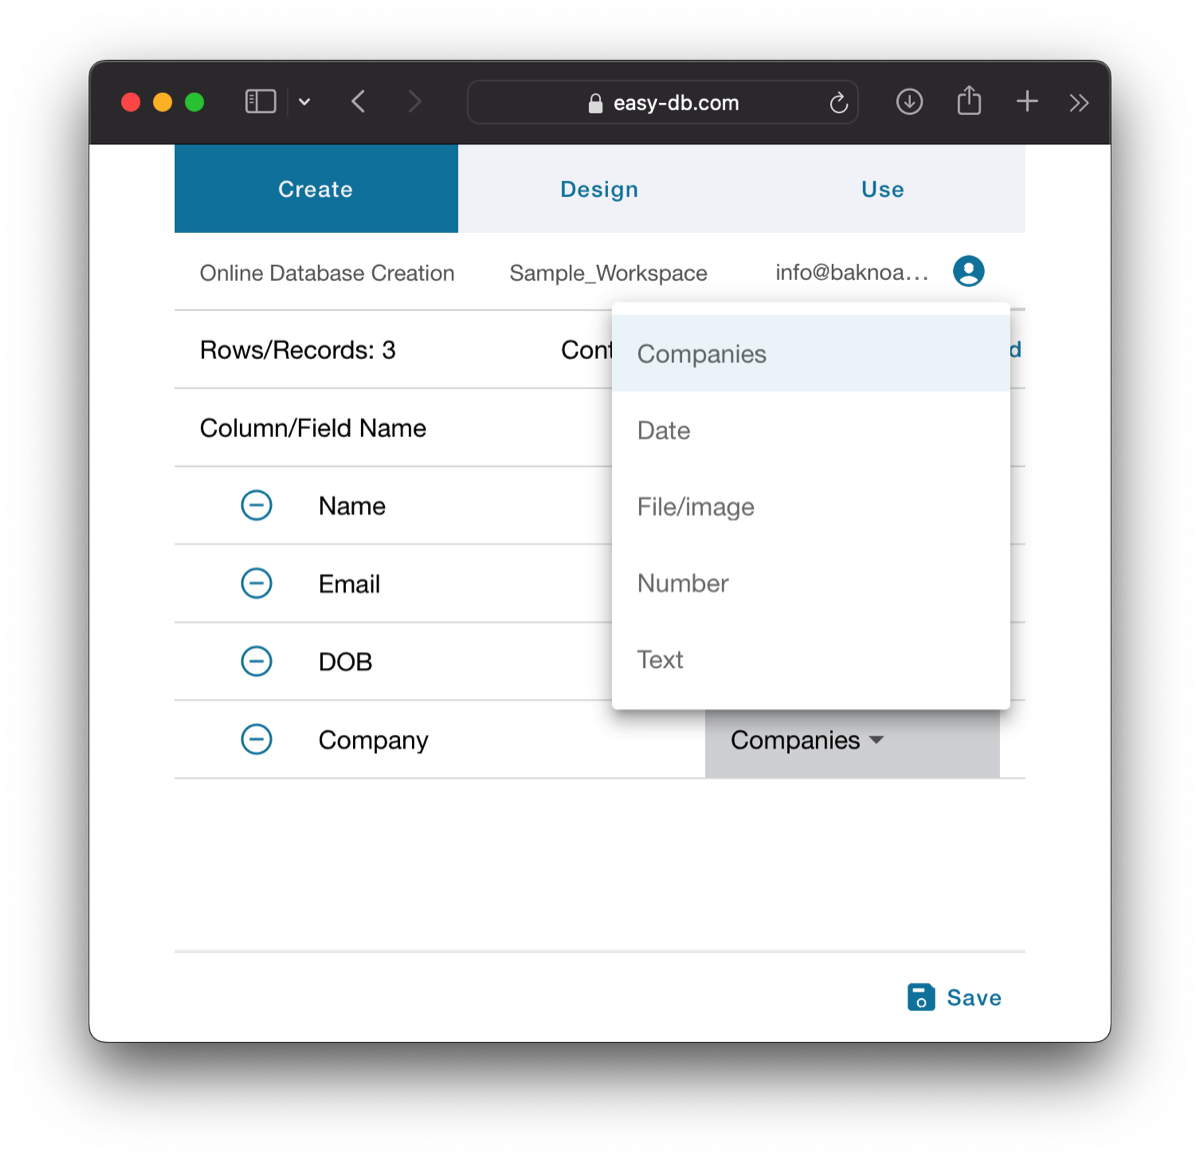
You have two options to create a new table, both located at the bottom of the screen. You can either add a new empty table where you can define the fields later, or import a CSV (comma separated values) file that crates fields and imports records at the same time. In the case of importing a CSV file, all fields will be defined as type "Text" by default. Therefore, it is important to check and ensure that the field types are correct. Defining a field type is a simple task using a dropdown menu.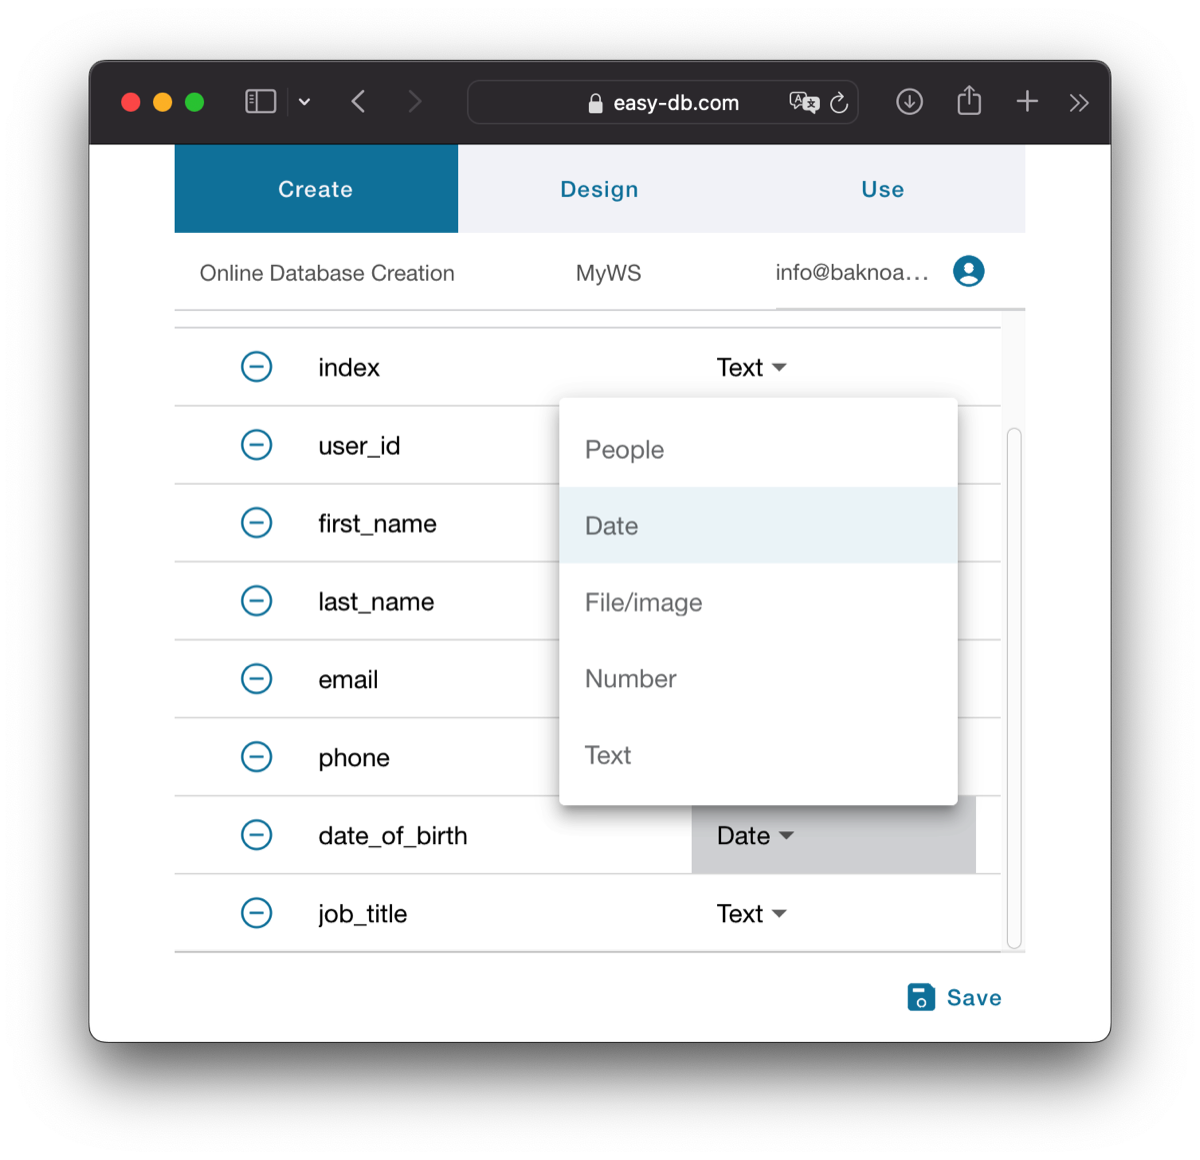
Any previously created table becomes a new type of field in this dropdown menu. This is used to establish a relation between two tables. For example, in the Contacts/Companies scenario, you would first create the "parent" table, which is Companies. Then, when you define a field's type in the Contacts table, an option for Companies becomes available. This allows you to establish a parent/child relationship between the two tables. With this relation, it is understood that a single record from Companies (parent record) can be associated with multiple records from Contacts (children records), and conversely, a child record is associated with a single parent record.
Design
Once tables and fields are defined in the Create tab, you can proceed to define forms and their components in the Design tab. Similar to creating tables in the Create tab, you create forms in the Design tab (without the import option). Each form is associated with a single table and you can create more than one form per table. When editing a form, you can add fields from the associated table, fields from related parent records (if defined), or lists of related children records (if defined).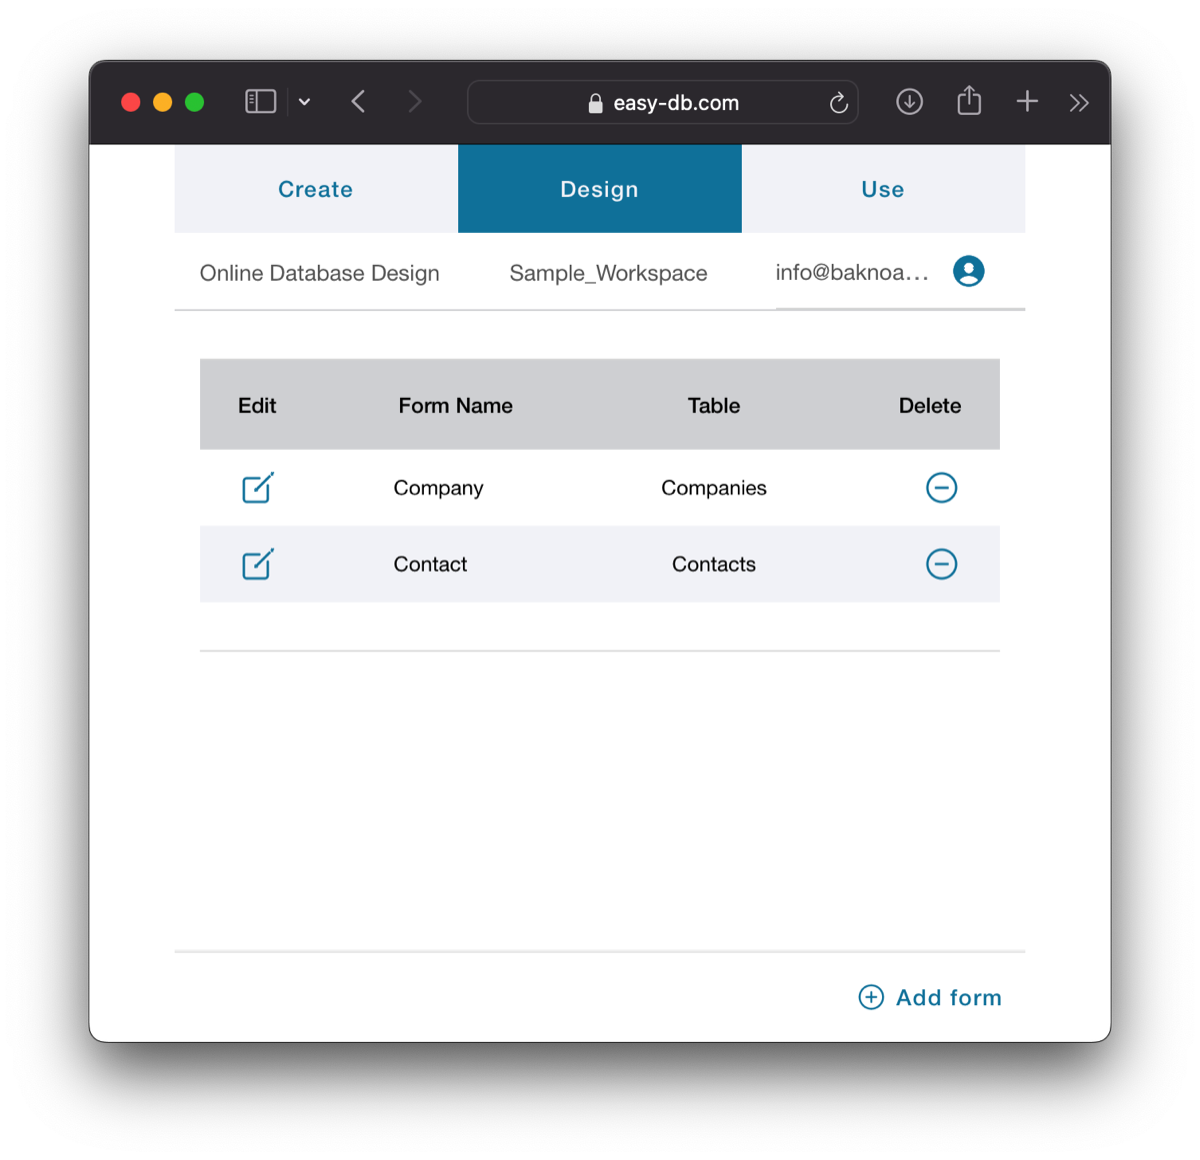
In the Design tab, what you really add to a form is not a field directly but something called Component, which is the visual and interactive representations of a field. Each type of field typically has its own corresponding component. For example, a Date field is best presented as a drop-down calendar widget. However, components are not limited to being associated with fields alone; the goal is to have useful components that enhance the presented information. For instance, there is a Calculation component capable of performing calculations similar to those found in Excel.
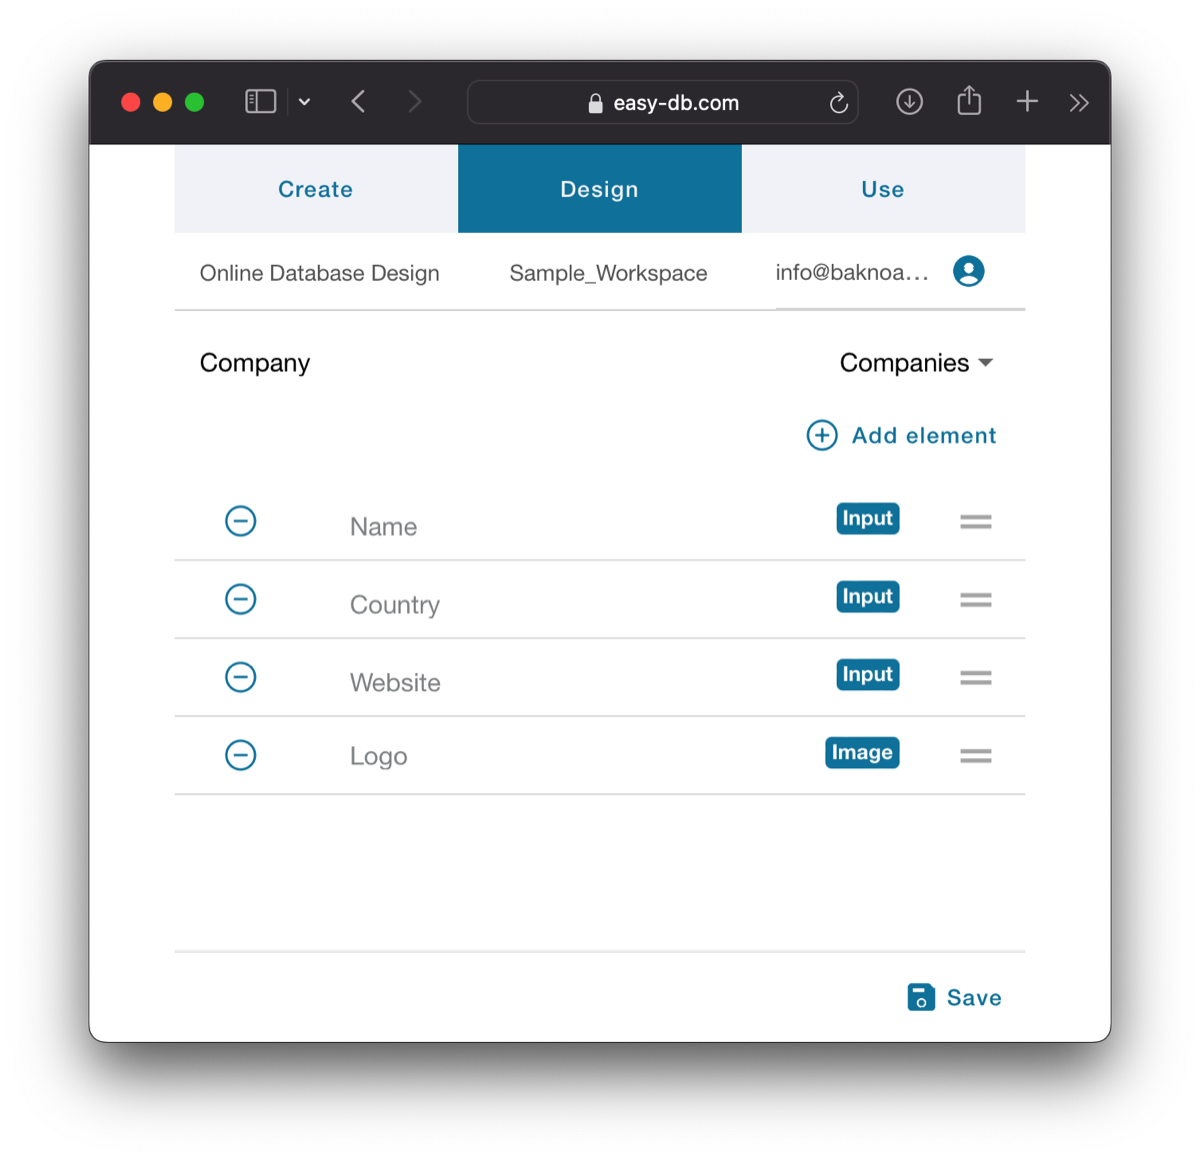
Components are stacked vertically below each other in the form, but you can easily change their order through drag and drop. Some components, such as File, Navigation, or Related List, are available only to advanced hosts. However, these components become accessible to basic guests when they utilize the advanced host workspace.
The difference between a Host and an Admin is that the Host is the owner of the workspace and as such is the only one with access to a page called "Workspace Manager", available from the user menu, which is activated by clicking the area at the top right corner.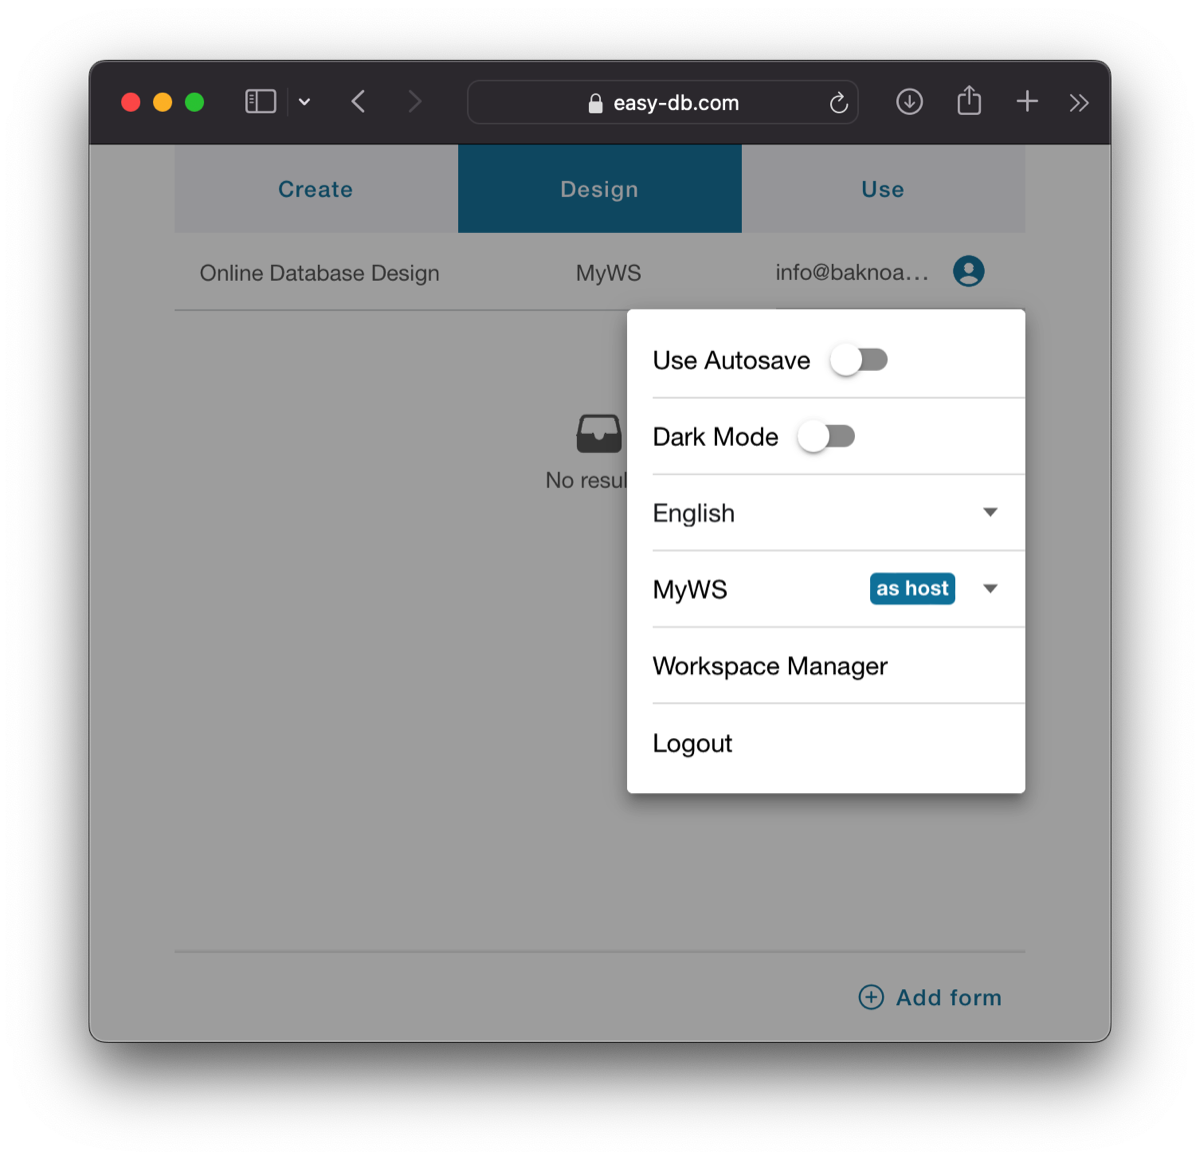
From the user menu you can change other settings like the Auto Save option, the Dark Mode option, the Language, the Workspace or directly select to logout.
From the Workspace Manager you can change the name of the workspace, you can see the list of users and you can either change their profiles, delete them, or you can invite new users to have access to your workspace.

© baKno 2023. All rights reserved.